Some Mac users who upgraded to OS X Yosemite have discovered a variety of wireless network connectivity issues, ranging from dropping wi-fi connections, to an inability to connect to the outside world despite being connected to a wifi router, even suddenly and strangely slow internet speeds. These network issues seem to occur most often on Macs that have updated to OS X Yosemite from Mavericks rather than those who performed a clean Yosemite install, which could suggest the issue has to do with improper network setting and preferences, or even a corrupted file somewhere. That’s a good thing, because it should mean a resolution is fairly easy to implement, as we’re about to show you.
It should be noted that it’s difficult to point to a single cause for sudden and unexpected wireless troubles with any OS X version, and there may be different causes for different users. Accordingly, it’s challenging to offer a single solution to the Yosemite Wi-Fi problems that users are experiencing. With that said, we’ve been able to resolve the problem for many Macs by using the steps outlined below. This involves editing some system level configuration files, and you should probably start a Time Machine backup before proceeding just to be on the safe side of things.
1: Remove Network Configuration & Preference Files
Manually trashing the network plist files should be your first line of troubleshooting. This is one of those tricks that consistently resolves even the most stubborn wireless problems on Macs of nearly any OS X version. This is particularly effective for Macs who updated to Yosemite that may have a corrupt or dysfunctional preference file mucking things up:
- Turn Off Wi-Fi from the Wireless menu item
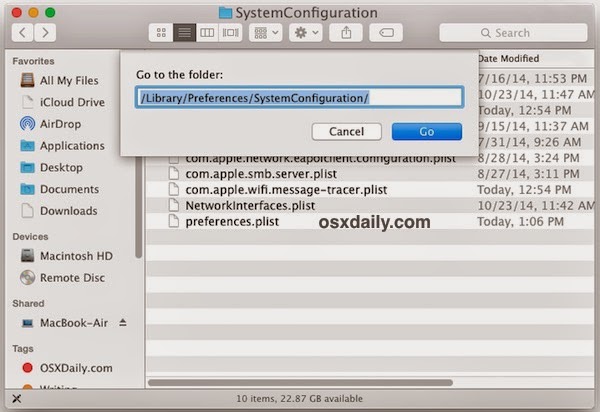
- From the OS X Finder, hit Command+Shift+G and enter the following path:
/Library/Preferences/SystemConfiguration/
3. Within this folder locate and select the following files:
com.apple.airport.preferences.plist
com.apple.network.identification.plist
com.apple.wifi.message-tracer.plist
NetworkInterfaces.plist
preferences.plist
4. Move all of these files into a folder on your Desktop called ‘wifi backups’ or something similar – we’re backing these up just in case you break something but if you regularly backup your Mac you can just delete the files instead since you could restore from Time Machine if need be
5. Reboot the Mac
6. Turn ON WI-Fi from the wireless network menu again
This forces OS X to recreate all network configuration files. This alone may resolve your problems, but if you’re continuing to have trouble we recommend following through with the second step which means using some custom network settings.
2: Create a New Wi-Fi Network Location with Custom DNS
What we’re doing here is creating a new network location which is going to have a configuration different from the defaults. First, we’ll use a completely new network setup. Then, we’ll set DNS on the computer rather than waiting for OS X to get DNS details from the wi-fi router, which alone can resolve many issues with DNS lookups, since Yosemite seems to be finicky with some routers. Finally, we’re going to set a custom MTU size that is slightly smaller than the default, which will get rejected less often by a router, it’s an old netadmin trick that has long been used to fix network troubles.
- Open the Apple menu and go to System Preferences, then choose “Network”
- Pull down the “Locations” menu and choose “Edit Locations”, then click the [+] plus button, give the new network location a name like “Yosemite WiFi” then click Done
3. Next to “Network Name” join your desired wifi network as usual
4. Now click the “Advanced” button, and go to the “DNS” tab
5. Click the [+] plus button and specify a DNS server – we’re using 8.8.8.8 for Google DNS in this example but you should use the fastest DNS servers you can find for your location, it will vary. You can also use your own ISP DNS servers
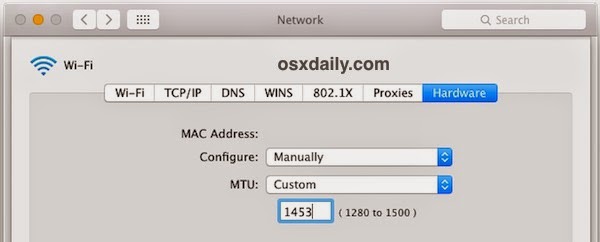
6. Now go to the “Hardware” tab and click on ‘Configure’ and choose “Manually”
7. Click on MTU and change it to “Custom” and set the MTU number to 1453 (this is a networking secret from ancient times, and yes it still works!), then click on “OK”
8. Now click on “Apply” to set your network changes
Quit and relaunch any apps that require network access, like Safari, Chrome, Messages, Mail, and your wireless connectivity should be flawless and back at full speed at this point.
Reset SMC
Some users report that resetting the System Management Controller is sufficient to stir their Wi-Fi back into action. Since many users have a MacBook laptop, that’s what we’ll cover first:
- Turn off the MacBook Air or MacBook Pro
- Connect the power adapter to the Mac as usual
- On the keyboard, press and hold down the Shift+Control+Option keys and the Power button at the same time, hold them all for a few seconds
- Release all keys and the power button at the same time by lifting your hands away from the keyboard
- Boot the Mac as usual
You can read more about resetting SMC here and here for other Macs, including for the iMac and Mac Mini.
Unload & Reload discoveryd to Fix DNS & Wi-Fi Failures in OS X Yosemite
Another trick that was left in the comments (thanks Frank!) involves refreshing the discoveryd service by unloading and reloading it with the launchctl command. This is a bit curious but apparently it works for some users, suggesting there could be an issue with discovery or resolving DNS on some Yosemite Macs. It’s certainly worth a try if the above tricks failed to resolve your wi-fi connectivity problems in OS X 10.10, as there are a fair amount of positive reports with this one:
1. Open Terminal (found in /Applications/Utilities/ or with Spotlight) and enter the following command:
sudo launchctl unload -w /System/Library/LaunchDaemons/com.apple.discoveryd.plist
2. Hit return and enter an admin password to use the sudo command
3. Now run the following command to reload discoveryd (this used to be called mDNSResponder)
sudo launchctl load -w /System/Library/LaunchDaemons/com.apple.discoveryd.plist
4. Again hit Return to finish the command
You may need to relaunch apps that require network connectivity. Note that if you reboot the Mac with this one, you will have to repeat the above steps to unload and reload discoveryd into launchd.
Bonus OS X Yosemite Wi-Fi Troubleshooting Tricks
Here are some other less than ideal solutions that have been reported to remedy wi-fi issues in OS X Yosemite.
- Join a 2.4GHZ network (N network) – some users report no trouble with 2.4GHz networks
- Set the wi-fi routers 5GHz (G) channel to be somewhere between 50-120
- Turn Off Bluetooth – We have seen several reports that disabling Bluetooth will resolve wifi problems with some networks, but this is obviously not appropriate for Macs that have bluetooth accessories
If none of the above works, there could be other problems. Sometimes starting fresh with a clean install could resolve them, or if you believe the problem to be a bug and you had a trouble free experience in prior versions of Mac OS, you could alwaysdowngrade from OS X Yosemite to Mavericks again until an update to Yosemite arrives to resolve the issue once and for all.


.jpg)
Post a Comment